Sunday, November 8, 2015

Door Trim in Three Parts

Well, there were actually a lot more than three steps.  But these were three big ones:

1.  First, I had to make a miter sled.  I sawed solid wood shims and glued them as "runners" to the bottom of a sheet of plywood.  Then I sawed halfway through the sled, and mounted the plywood beams I built to the sled top, at exactly 90 degrees with respect to each other, and at 45 degrees with respect to the saw kerf now in the center of the sled. 
Special thanks to Charles Hurst and Kristina Arnold for his "gravity clamp" innovation.  Also, thanks to Chester Cornett (I actually saw it in MOJ before I heard Charles name it).
Now, a piece of trim, clamped to the beam and run through the saw, will be cut at 45 degrees.  Two pieces, each cut on opposing beams will make 90 degrees.

Then, I had to figure out how to create a fence for my router and determine the depth of cut on some scrap pieces. 


2.  Then, I used an angle grinder to cut and grind the bricks flush to one another, so trim can be layed smoothly overtop of them. 
I also used the angle grinder to cut away some of the old plaster that was too thick, and too near the doorway on the inside. 
This plaster will be replaced in the spring by yours truly.  It was a dirty job.


3.  Then, I could rout and joint the trim boards and try to mount them to the wall.  Do you remember that totally crooked, assymetrical header beam that is holding all the bricks above the door up?  Well, here is the crooked shim board I cut and planed in order to get my trim boards to lie flush against it.
 

And, voila!  The door is now permanently part of the wall, and the gaps have been sealed. 


The next step is figuring out how to mount the decorative reeded panel that will inlay in inside of the door jamb, making it, and mounting it into the jamb.  I have transported rough-sawn boards back to my shop/apartment in BG to work on/develop this from home.  When its 80% done, I'll try to put it in.  That will likely happen after exam week. 

This was a big week.  Thanks for reading.

NS


Sunday, November 1, 2015


I’ve been working on some projects that allow me to work at home (in Bowling Green) on the Gardner House Project. 

The main goal of the semester has been to finish installing the door.  The door is in the house (picture to come) and is in use and lockable.  That was one of those should-have-been-a-small-job-but-was-really-a-massive-job types of jobs. 

I’ve been working the past few weeks at developing the infrastructure in Bowling Green at my apartment to allow me to turn these rough black walnut boards donated by Charile Williams into moulding trim that will seal the open spaces between the wooden jamb and the repaired brick wall.  We’ll use spare shake shingles to shim the spaces between the bricks and jamb to create some more pressure and tension.  Then, we’ll close the opening with wood trim, flush against the masonry (fingers crossed).    

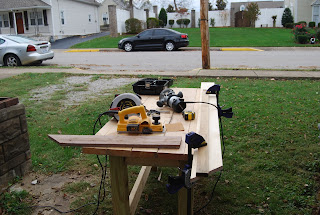
A few weeks ago I built the bench.  This is a view of the crooked board, with my hand held planer that I used to make the board straighter on top


This weekend I used my two new jigs (built last weekend) to try working up a piece of the walnut, to see if I can do it.  First, I used my power hand planer to take down the largest and most out-of-square parts of the boards.  I took about an inch off one end of the right side. 


Then, I set up this jointing jig that I learned about on the Youtube Channel “Rockin-H-Woodshop,” and used my new table saw’s blade to skim about a 1/6th of an inch off the right side of the board.  I checked to see if it was straight and it was!  About 1/32” off one way or another.  I used the newly “square” side against my fence to rip the rough side.  Then, I flipped it back around and ripped off my “mostly square” side with the ripped side against the fence.  Now, I have a straight 1X6!  Awesome!


The jig is bolted onto the fence with recessed 3 inch hex bolts.  I took the moving blade up into the wood fence, half buried so that some of the blade was showing.  Then, I glued a 1/16 inch strip of wood along the behind-the-blade end of the wood fence-face.  The wood strip allows the wood to run evenly (and safely) along the blade/wood fence even though 1/16 of an inch has been removed.


I also put my new cross-cut sled to the test.  If this sled worked, then I could feel good about using my table saw as the principle saw for the upcoming deck-building project.  I could also then justify spending a half-day building a similar miter sled for the table saw, and eliminate the need (for the time being) to buy a miter saw.  


The sled works great and makes totally square cuts.  Because I’m using a jobsite portable table saw and not a permanent cast iron table saw (about $1500 in cost difference) it’s a lot harder for me to set up stop blocks for repeated cuts (my table is small) and this sled is really only safe/efficient for making cuts on shorter, non-eight-foot pieces of wood.  So, I’m working up my pieces into rough lengths with my handheld skill saw and finishing them with the table saw.  Seems like a good compromise.  I learned how to build the miter sled and cross cut sled from Wood Working for Mere Mortals (Steve Ramsey’sYoutube Channel). 

This week I also bought a router and practiced making cuts.  I’m shopping for the appropriate bit to match the Gardner House’s patterns, and hopefully, we’ll have square boards with decorative patterns by the end of the week.  Also, I fixed the generator again this week, as well as my undependable angle grinder.  With some luck, I'll have finished cleaning up my rough brick edges on the door by the end of the week.  Installation may have to wait until after exams…we’ll see.

Thanks for reading!

NS

Thursday, September 17, 2015

2015 OPEN HOUSE ANNOUNCED !!!

2015 OPEN HOUSE ANNOUNCED !!!
We'd love to see you at the 2015 Gardner House and Kiln Open House Saturday 9/26/15 from 10am to 3pm.  If it's been a while since you've visited the Gardner House, you'll be pleasantly surprised at the progress.
 
Also, this Open House is unlike no other.  It is a once-in-a-lifetime opportunity to view not only the Gardner House, but also the excavated remnants of the on-premises clamp kiln before it is reburied.  This is the kiln in which we believe the bricks for the Gardner House were fired.
 
Please feel free to copy the attached invitation and forward this information via email or social media.  Thank you so much.
 
See you there!
The Gardner House


Sunday, March 15, 2015

New Door Jamb

Last semester, we started working on reshaping the door opening.  We pulled out rotten bricks and dug out deteriorating mortar.  This semester we finished filling in the open spaces on the wall and are now working toward building a door jamb to fit the new opening.


Before we could begin, I needed to build some of the tools to help us build the door jamb.  Here is our workbench, and on top of the workbench, is a rip fence, made of OSB plywood.

The rip fence was built to match the exact dimensions of my hand-held circular saw, so that I could push the saw directly against the clamped fence, to create a straight cut, "ripping" through wood along or across the grain.

The most difficult cuts on the circular saw were for the bottom portion of the door jamb.  I managed to measure the pitch of the hand-cut stone drip edge threshold at 10 degrees.

So, I needed to taper the bottom end of the door jamb downward from the indoor side, outdoor at a 10 degree angle.  Here is one of the trickier cuts on one of the bottom pieces.  I learned that my saw is not powerful enough for precise ripping, unless I do little things to help it like making relief cuts with my handsaw, and just plain going slow.


Another challenge was that I had no idea how to cut the mortises and dadoes for the hinges and door jamb supports.  I figured that my best bet was a hammer and chisel, since my only power tools were a hand held circular saw and a drill.  I used a circular saw to make measured relief cuts for my dadoes, then cleaned them out with the chisel, whereas for the door hinge mortises, I used only a hammer and chisel.  It seemed more accurate that way.


There were some problems and struggles along the way, but this moment was really satisfying. Not only does the door fit nicely in the jamb, but the jamb fits nicely in the opening.


I realized during this moment of truth, that my hole saw does not cut deep enough to work two-inch wood, and that I am not strong enough to hang this door by myself.  I was advised to mount the hinges, then just "drop the pins" through the hinge holes, but the commercial grade hinges we have had fixed pins, so I would have had to support the whole weight of the door with one arm and drive the screws with the other.  Probably not.

So, the old door and jamb are still in place and the new door and jamb are sitting in the parlor, waiting for next weekend.  Eventually, we are committed to a swinging door by the end of the semester. The open panels on the door jamb you see are left that way to accommodate a black walnut decorative center panel that will be recessed to the level of the interior structural pieces and finish nailed to the cross-pieces.  We will attempt to rout the decorative reeded pattern into them before we set them in place.

Community Open House

Thanks for stopping by the Gardner Historic House blog! If you'd like to visit the actual house, now's your chance.

The Gardner House will be open to the public THIS SATURDAY, September 27, 2014 from 9:00am to 3:00pm. SEE YOU THERE! For more information, go to
or

We look forward to seeing you there!